Kubernetes Ingress with Nginx Example
What is an Ingress?
In Kubernetes, an Ingress is an object that allows access to your Kubernetes services from outside the Kubernetes cluster. You configure access by creating a collection of rules that define which inbound connections reach which services.
This lets you consolidate your routing rules into a single resource. For example, you might want to send requests to
example.com/api/v1/ to an api-v1 service, and requests to example.com/api/v2/ to the api-v2 service. With an Ingress, you can easily set this up without creating a bunch of LoadBalancers or exposing each service on the Node.
Which leads us to the next point…
Kubernetes Ingress vs LoadBalancer vs NodePort
These options all do the same thing. They let you expose a service to external network requests. They let you send a request from outside the Kubernetes cluster to a service inside the cluster.
NodePort
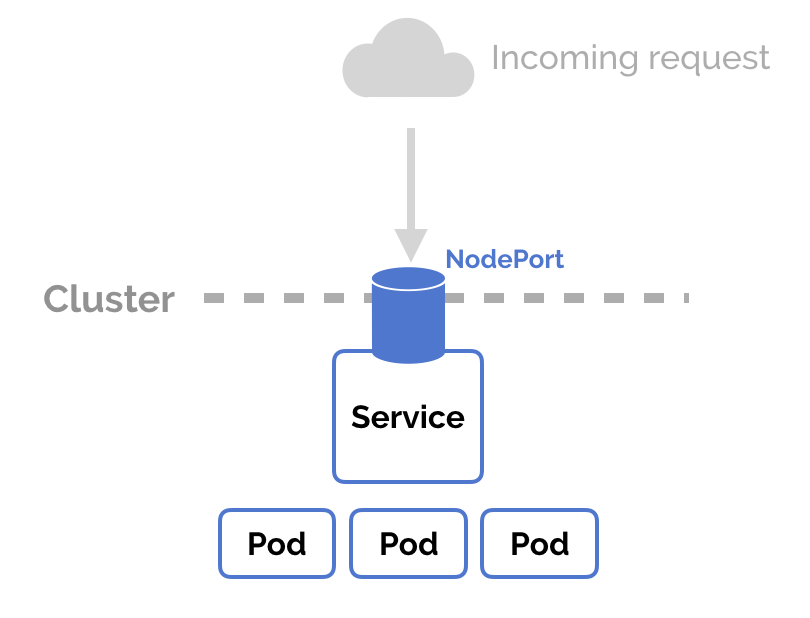
NodePort is a configuration setting you declare in a service’s YAML. Set the service spec’s type to NodePort. Then, Kubernetes will allocate a specific port on each Node to that service, and any request to your cluster on that port gets forwarded to the service.
This is cool and easy, it’s just not super robust. You don’t know what port your service is going to be allocated, and the port might get re-allocated at some point.
LoadBalancer
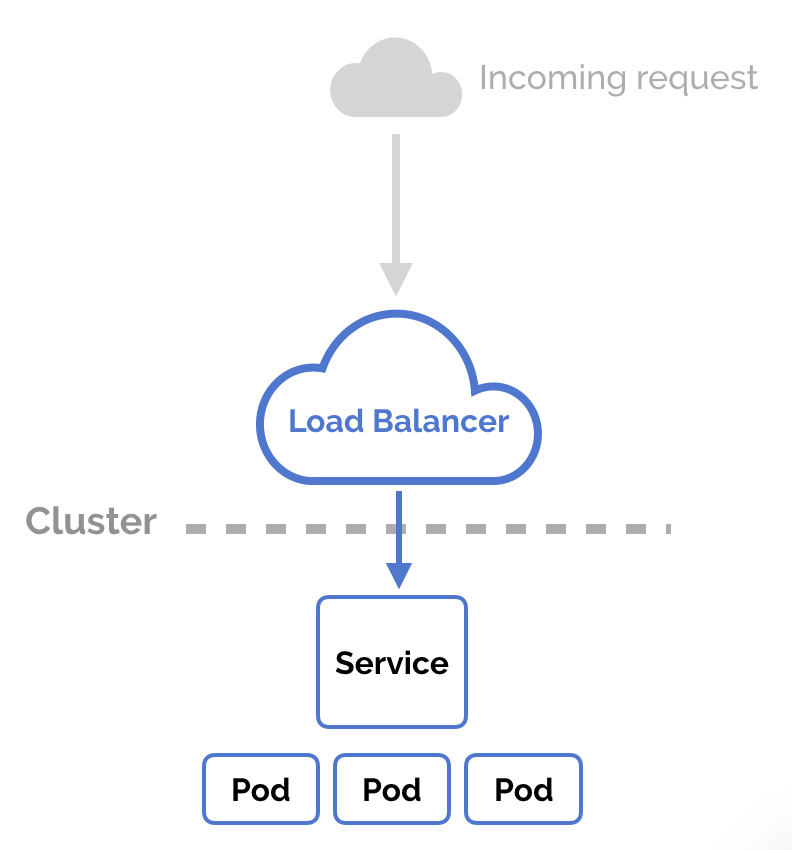
You can set a service to be of type
LoadBalancer the same way you’d set NodePort— specify the type property in the service’s YAML. There needs to be some external load balancer functionality in the cluster, typically implemented by a cloud provider.
This is typically heavily dependent on the cloud provider—GKE creates a Network Load Balancer with an IP address that you can use to access your service.
Every time you want to expose a service to the outside world, you have to create a new LoadBalancer and get an IP address.
Ingress

NodePort and LoadBalancer let you expose a service by specifying that value in the service’s type. Ingress, on the other hand, is a completely independent resource to your service. You declare, create and destroy it separately to your services.
This makes it decoupled and isolated from the services you want to expose. It also helps you to consolidate routing rules into one place.
The one downside is that you need to configure an Ingress Controller for your cluster. But that’s pretty easy—in this example, we’ll use the Nginx Ingress Controller.
How to Use Nginx Ingress Controller
Assuming you have Kubernetes and Minikube (or Docker for Mac) installed, follow these steps to set up the Nginx Ingress Controller on your local Minikube cluster.
Installation Guide
- Start by creating the “mandatory” resources for Nginx Ingress in your cluster.
kubectl apply -f https://raw.githubusercontent.com/kubernetes/ingress-nginx/master/deploy/mandatory.yaml - Then, enable the ingress add-on for Minikube.
minikube addons enable ingress - Or, if you’re using Docker for Mac to run Kubernetes instead of Minikube.
kubectl apply -f https://raw.githubusercontent.com/kubernetes/ingress-nginx/master/deploy/provider/cloud-generic.yaml - Check that it’s all set up correctly.
kubectl get pods --all-namespaces -l app=ingress-nginx
This has set up the Nginx Ingress Controller. Now, we can create Ingress resources in our Kubernetes cluster and route external requests to our services. Let’s do that.
Creating a Kubernetes Ingress
First, let’s create two services to demonstrate how the Ingress routes our request. We’ll run two web applications that output a slightly different response.
Create the resources
$ kubectl apply -f apple.yaml
 $ kubectl apply -f banana.yaml
Now, declare an Ingress to route requests to
/apple to the first service, and requests to /banana to second service. Check out the Ingress’ rules field that declares how requests are passed along.
Create the Ingress in the cluster
kubectl create -f ingress.yaml
Perfect! Let’s check that it’s working. If you’re using Minikube, you might need to replace
localhost with 192.168.99.100.$ curl -kL http://localhost/apple
apple
$ curl -kL http://localhost/banana
banana
$ curl -kL http://localhost/notfound
default backend - 404Summary
A Kubernetes Ingress is a robust way to expose your services outside the cluster. It lets you consolidate your routing rules to a single resource, and gives you powerful options for configuring these rules.
By : https://matthewpalmer.net/
By : https://matthewpalmer.net/
Comments