Sunday, November 10, 2019

Kubernetes Ingress with Nginx Example

Kubernetes Ingress with Nginx Example

What is an Ingress?

In Kubernetes, an Ingress is an object that allows access to your Kubernetes services from outside the Kubernetes cluster. You configure access by creating a collection of rules that define which inbound connections reach which services.
This lets you consolidate your routing rules into a single resource. For example, you might want to send requests to example.com/api/v1/ to an api-v1 service, and requests to example.com/api/v2/ to the api-v2 service. With an Ingress, you can easily set this up without creating a bunch of LoadBalancers or exposing each service on the Node.
Which leads us to the next point…

Kubernetes Ingress vs LoadBalancer vs NodePort

These options all do the same thing. They let you expose a service to external network requests. They let you send a request from outside the Kubernetes cluster to a service inside the cluster.

NodePort
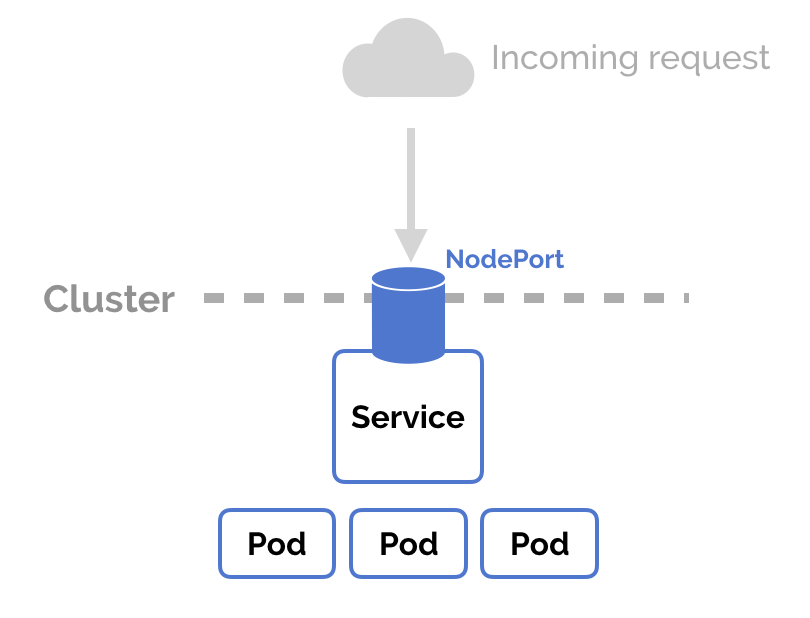
nodeport in kubernetes
NodePort is a configuration setting you declare in a service’s YAML. Set the service spec’s type to NodePort. Then, Kubernetes will allocate a specific port on each Node to that service, and any request to your cluster on that port gets forwarded to the service.
This is cool and easy, it’s just not super robust. You don’t know what port your service is going to be allocated, and the port might get re-allocated at some point.

LoadBalancer
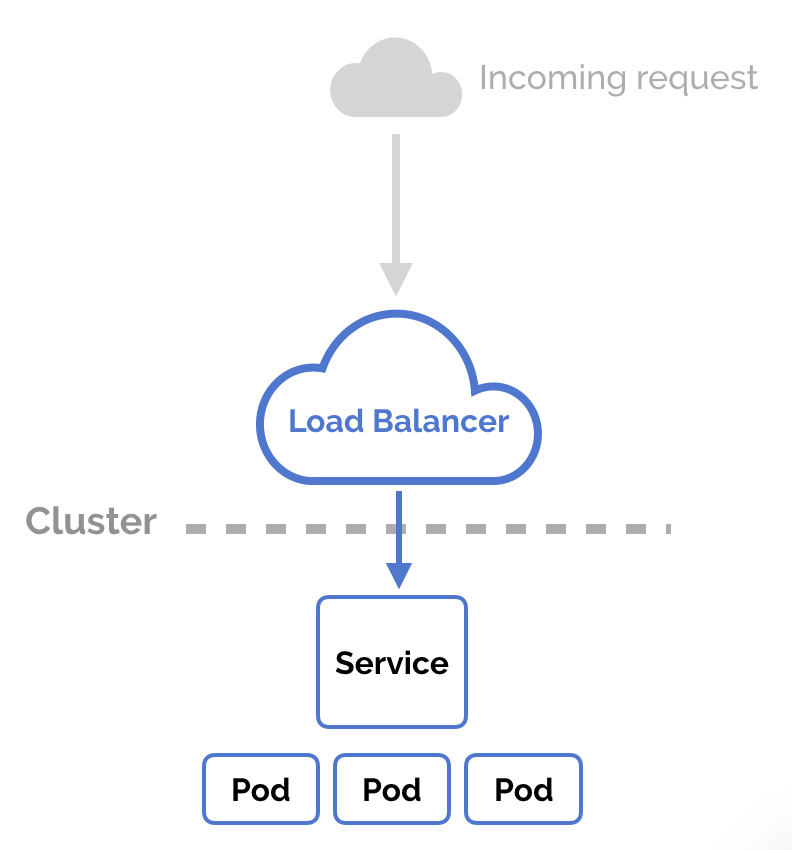
loadbalancer in kubernetes
You can set a service to be of type LoadBalancer the same way you’d set NodePort— specify the type property in the service’s YAML. There needs to be some external load balancer functionality in the cluster, typically implemented by a cloud provider.
This is typically heavily dependent on the cloud provider—GKE creates a Network Load Balancer with an IP address that you can use to access your service.
Every time you want to expose a service to the outside world, you have to create a new LoadBalancer and get an IP address.

Ingress
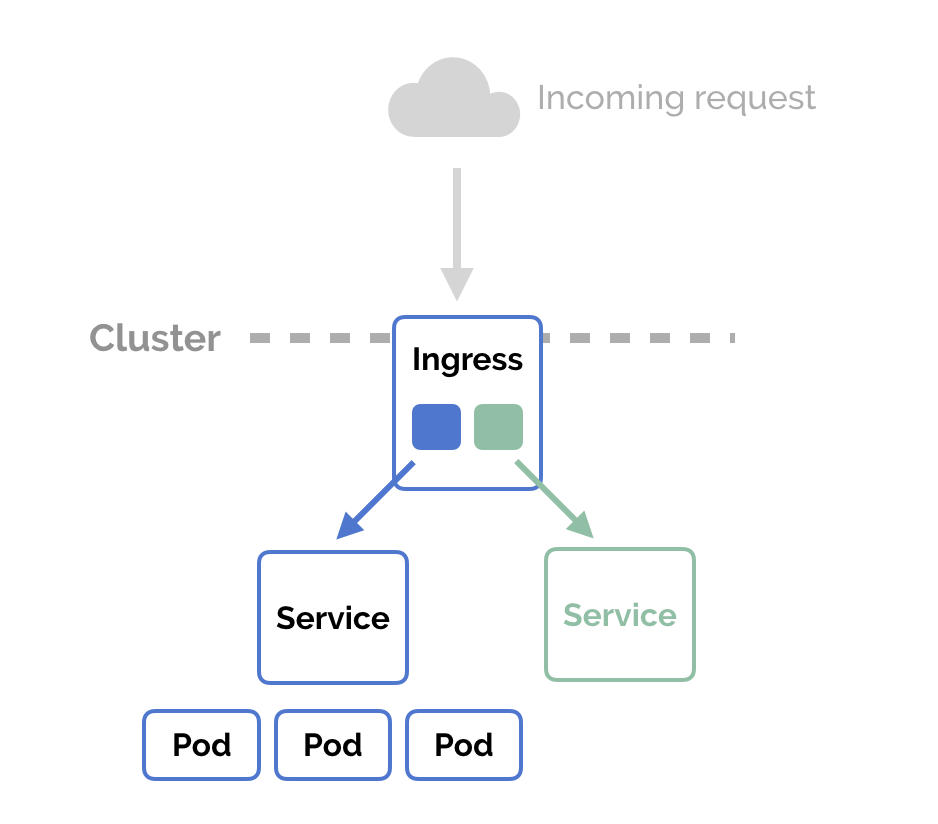
ingress in kubernetes
NodePort and LoadBalancer let you expose a service by specifying that value in the service’s type. Ingress, on the other hand, is a completely independent resource to your service. You declare, create and destroy it separately to your services.
This makes it decoupled and isolated from the services you want to expose. It also helps you to consolidate routing rules into one place.
The one downside is that you need to configure an Ingress Controller for your cluster. But that’s pretty easy—in this example, we’ll use the Nginx Ingress Controller.

How to Use Nginx Ingress Controller

Assuming you have Kubernetes and Minikube (or Docker for Mac) installed, follow these steps to set up the Nginx Ingress Controller on your local Minikube cluster.

Installation Guide

  1. Start by creating the “mandatory” resources for Nginx Ingress in your cluster.
    kubectl apply -f https://raw.githubusercontent.com/kubernetes/ingress-nginx/master/deploy/mandatory.yaml
  2. Then, enable the ingress add-on for Minikube.
    minikube addons enable ingress
  3. Or, if you’re using Docker for Mac to run Kubernetes instead of Minikube.
    kubectl apply -f https://raw.githubusercontent.com/kubernetes/ingress-nginx/master/deploy/provider/cloud-generic.yaml
  4. Check that it’s all set up correctly.
    kubectl get pods --all-namespaces -l app=ingress-nginx
This has set up the Nginx Ingress Controller. Now, we can create Ingress resources in our Kubernetes cluster and route external requests to our services. Let’s do that.

Creating a Kubernetes Ingress

First, let’s create two services to demonstrate how the Ingress routes our request. We’ll run two web applications that output a slightly different response.
kind: Pod
apiVersion: v1
metadata:
name: apple-app
labels:
app: apple
spec:
containers:
- name: apple-app
image: hashicorp/http-echo
args:
- "-text=apple"
---
kind: Service
apiVersion: v1
metadata:
name: apple-service
spec:
selector:
app: apple
ports:
- port: 5678 # Default port for image
view rawapple.yaml hosted with ❤ by GitHub
kind: Pod
apiVersion: v1
metadata:
name: banana-app
labels:
app: banana
spec:
containers:
- name: banana-app
image: hashicorp/http-echo
args:
- "-text=banana"
---
kind: Service
apiVersion: v1
metadata:
name: banana-service
spec:
selector:
app: banana
ports:
- port: 5678 # Default port for image
view rawbanana.yaml hosted with ❤ by GitHub
Create the resources
$ kubectl apply -f apple.yaml
 $ kubectl apply -f banana.yaml
Now, declare an Ingress to route requests to /apple to the first service, and requests to /banana to second service. Check out the Ingress’ rules field that declares how requests are passed along.
apiVersion: extensions/v1beta1
kind: Ingress
metadata:
name: example-ingress
annotations:
ingress.kubernetes.io/rewrite-target: /
spec:
rules:
- http:
paths:
- path: /apple
backend:
serviceName: apple-service
servicePort: 5678
- path: /banana
backend:
serviceName: banana-service
servicePort: 5678
view rawingress.yaml hosted with ❤ by GitHub
Create the Ingress in the cluster
kubectl create -f ingress.yaml
Perfect! Let’s check that it’s working. If you’re using Minikube, you might need to replace localhost with 192.168.99.100.
$ curl -kL http://localhost/apple
apple

$ curl -kL http://localhost/banana
banana

$ curl -kL http://localhost/notfound
default backend - 404

Summary

A Kubernetes Ingress is a robust way to expose your services outside the cluster. It lets you consolidate your routing rules to a single resource, and gives you powerful options for configuring these rules.

By : https://matthewpalmer.net/

Thursday, June 20, 2019

What is Docker?

What is Docker?

Docker is a tool designed to make it easier to create, deploy, and run applications by using containers. Containers allow a developer to package up an application with all of the parts it needs, such as libraries and other dependencies, and ship it all out as one package. By doing so, thanks to the container, the developer can rest assured that the application will run on any other Linux machine regardless of any customized settings that machine might have that could differ from the machine used for writing and testing the code.

In a way, Docker is a bit like a virtual machine. But unlike a virtual machine, rather than creating a whole virtual operating system, Docker allows applications to use the same Linux kernel as the system that they're running on and only requires applications be shipped with things not already running on the host computer. This gives a significant performance boost and reduces the size of the application.

And importantly, Docker is open source. This means that anyone can contribute to Docker and extend it to meet their own needs if they need additional features that aren't available out of the box.

Who is Docker for?

Docker is a tool that is designed to benefit both developers and system administrators, making it a part of many DevOps (developers + operations) toolchains. For developers, it means that they can focus on writing code without worrying about the system that it will ultimately be running on. It also allows them to get a head start by using one of thousands of programs already designed to run in a Docker container as a part of their application. For operations staff, Docker gives flexibility and potentially reduces the number of systems needed because of its small footprint and lower overhead.

Getting started

Here are some resources that will help you get started using Docker in your workflow. Docker provides a web-based tutorial with a command-line simulator that you can try out basic Docker commands with and begin to understand how it works. There is also a beginners guide to Docker that introduces you to some basic commands and container terminology. Or watch the video below for a more in-depth look:


Source : https://opensource.com

Tuesday, April 2, 2019

Starting with Python

Many was asking my lately where to start learning python ,
So i will start with a small summary and then my number one recommended video for beginners  .

Python is an interpreted, object-oriented, high-level programming language with dynamic semantics. Its high-level built in data structures, combined with dynamic typing and dynamic binding, make it very attractive for Rapid Application Development, as well as for use as a scripting or glue language to connect existing components together. Python's simple, easy to learn syntax emphasizes readability and therefore reduces the cost of program maintenance. Python supports modules and packages, which encourages program modularity and code reuse. The Python interpreter and the extensive standard library are available in source or binary form without charge for all major platforms, and can be freely distributed.

Often, programmers fall in love with Python because of the increased productivity it provides. Since there is no compilation step, the edit-test-debug cycle is incredibly fast. Debugging Python programs is easy: a bug or bad input will never cause a segmentation fault. Instead, when the interpreter discovers an error, it raises an exception. When the program doesn't catch the exception, the interpreter prints a stack trace. A source level debugger allows inspection of local and global variables, evaluation of arbitrary expressions, setting breakpoints, stepping through the code a line at a time, and so on. The debugger is written in Python itself, testifying to Python's introspective power. On the other hand, often the quickest way to debug a program is to add a few print statements to the source: the fast edit-test-debug cycle makes this simple approach very effective.


Resources : python.org ,freeCodeCamp.org