
Installing Ubuntu using windows PXE


ok first we need a Pxe server we will use TFTP server you can download it here
and then we need the netboot for ubuntu and that we can download from here :
or

1.ok install the program that is vary simple
2.and then creak a directory name it PXE on drive C:
3.then run the program and switch to the tab "DHCP Server" and fill in your network setup like that >>

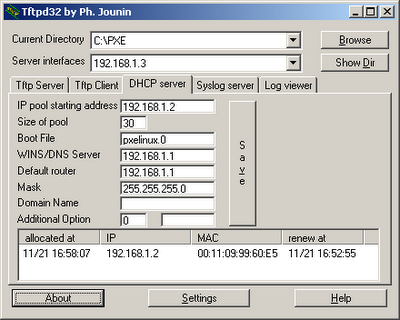
after that click save
4.Now we need to copy the Ubuntu netboot installer over to our PXE root directory
4.1unzip the file netboot
4.2 copy the folder ubuntu-installer to C:\PXE
4.3 copy the folder pxelinux.cfg from ubuntu-installer\i386\ to C:\PXE
4.4 copy the file pxelinux.0 from ubuntu-installer\i386\ to C:\PXE

at the end boot from tftp you may need to activate booting from the network interface in the BIOS

Good Luck


Comments

Popular posts from this blog

ESP32-C6 Wi-Fi Logger with Browser GPS + Heat Map Dashboard

This project is an ESP-IDF firmware for the Seeed Studio XIAO ESP32-C6 that turns the board into a self-hosted, secure Wi-Fi scanning logger. It creates its own access point, serves a responsive HTTPS web UI, logs nearby Wi-Fi access points, optionally tags rows with GPS coordinates (provided by the client browser), and exposes battery status from the on-board LiPo input. The end result is a pocket Wi-Fi “survey” tool: scan, track, export logs as CSV, and generate a heat map view to visualize RSSI vs location. Project overview and feature set: :contentReference[oaicite:1]{index=1} What it does AP + Station mode so the device can serve the dashboard while scanning nearby Wi-Fi networks. HTTPS web interface using a bundled certificate/key for local secure access. Single scan and continuous tracking modes. CSV export for analysis and archiving. Persistent logging to SPIFFS at /spiffs/logs.csv . Battery monitoring via ADC with voltage/percentage/status sh...

סלקום ממש לא כדאי לקנות מאצלכם מודים

סלקום באמת מבאס לגלוש אתכם !! בשעה טובה ומצלחת קניתי מודם סלולארי על מנת שאוכל לגלוש באינטרנט בעזרתו. בעמדת המכירה הציעו לי את מסלול תשלום מראש הידוע כtalkman, מסלול זה התאים לצרכי כך שאוכל לדעת מראש כמה אשלם ובחרתי לבצע את העיסקה. כאשר התחלתי לגלוש לשרתים המספקים תוכן כגון rapidshare , megaupload , zshare ועוד גיליתי כי כתובת הIP ממנה אני גולש חסומה, או עברה את כמות השימוש המותרת אולם זה קורה לפני שאני ביצעתי שימוש כלשהוא. ניסיתי להשתמש בכתובות אחרות באמצעות קבלת כתובת IP אחרת (הוצאה והכנסה של המכשיר נותנת כתובת חדשה), אולם בכל ניסיון הכתובות היו חסומות, כלומר לא יכלתי להשתמש כלל בשירות. נתון זה שהכתבות כבר בשימוש ומי שמתמש בכתובת דינאמיות חסום לא נאמר לי ולא הועלה בעת המכירה. מה שקורה שבכל אתר שאני רוצה להשתמש בו אני חסום ולא יכול להשתמש. דברתי עם מספר חברים שיש להם מודמים כאלה כבר זמן רב , כששאלתי איך לפתור : אמרו כי הבעייה נפתרה לנו ע"י שינוי בתוך המודם ל: ABN = intereal ו זה בשפה המקצועית אומר " IP קבוע" שמחתי ל פתרון ו נגשתי ל סלקום אחרי 30 דקות המתנה...

USB Hidden Copier

This sneaky little program will copy any USB drive content to your hard drive without detection of the USB owner. 1. It is totally invisible and masked enough in order not to be detected easily. 2. It will copy a maximum of 8GB that is enough space and information will not fit all hard drive space if you can not monitor it for a long time. 3. Content is saved in a folder named as the copied Usb Drive name so you can find easily who is the owner of usb copied. 4. It starts at startup of computer. 5. First copy is made 3 minutes after computer starts and then every 10 minutes the content will be overwritten, so you will have always lasted content of that USB. 6. With it’s Control Panel you can easily manage it. 7. Content copied is saved by default in: “C:\ WINDOWS \sysbackup\” 8. The copier program is called “systemidle. exe ” in order to mask it. 9. In order not to copy you own USB Drive you can create a file named “friendflag.winxp” and put it directly on your usb (this fil...